Checklist for International Shipping 2: Getting set-up
In Part 2 of our series on Checklist for International Shipping, we go through how to get set-up for successful international shipping - from figuring out your carriers and taxes, to setting up shipping rates.

Welcome back to Part 2 of Ship&co’s Checklist for International Shipping!
In Part 1, we looked at the checklist you should go through when deciding whether to ship internationally - even before taking that first step at shipping abroad.
Today, in Part 2, we’ll look at how to get set up on international shipping, and in our next post, Part 3, we’ll go through the step-by-step shipping and post-shipping process.
Selling and shipping internationally may sound daunting in the beginning, but once you have a good initial set-up, shipping abroad on a regular basis becomes much more of a breeze.
Here are the main upfront setup required - we’ll go through each in detail.
1. Create carrier accounts
2. Determine what to charge your customers for shipping
3. Determine how you will pay for duties and taxes
4. Set up shipping rates and methods for your shop
1. Create carrier accounts
For the shipping carriers that you’ve researched about and shortlisted from Part 1, you will need a shipping account with each of them in order to place shipping requests and settle billing moving forward.
The account opening process is simple - you can easily do so online at the carrier’s main website, or by calling the carrier’s local office. You will need to share some basic information to get started.
Some typical questions include:
- Whether you’re creating an import or export account
- Your expected shipment volumes per month
- Typical sizes of your parcels
- Typical destinations you expect to be sending to
Once you’ve shared these basic information, your account can typically be set up within 3-5 working days, though it depends on the carrier requirements.
A few important tips here.
Firstly, work with multiple carriers. It may seem like a hassle to create more than one carrier account, but it will be well worth it. Working with multiple carriers helps ensure that you are getting the best rate. During the initial account setups, by working with multiple carriers, you will have rates benchmark to be able to negotiate better rates. Later on, when you’re shipping out, one carrier may be cheaper than another depending on the particular shipment (size, destination, delivery type). And because you only pay for what you shipped, you don’t have to worry about having any extra set-up or maintenance fees by having multiple accounts.
Secondly, regardless of whether you start the account opening process online or over the phone, try to meet or at least speak to a customer representative. In this way, you will be able to discuss your specific requirements in detail, be able to negotiate your rates, and have a contact point for future support.
2. Determine what to charge your customers
Once you’ve set up your carrier accounts, another important setup is to determine what you will be charging your customers for shipping. There are various strategies for setting the shipping rate.
Free Shipping
Free shipping is a useful marketing tactic that can entice customers visiting the store. However, Free Shipping doesn’t always have to be Free, and there are various ways to offer some form of Free Shipping.
- 100% borne by seller: The most obvious way to offer Free Shipping is to absorb 100% of the shipping cost as a seller.
- 100% borne by customer: You can also offer “Free Shipping” but price in the shipping cost. For example, if you’re planning to sell an item at $20, but the shipping cost is $5, you would charge $25 and offer “Free Shipping”.
- Combination: You can subsidize the cost of shipping partially as a seller instead of absorbing 100% of the cost. In the above example, you could either charge a lower shipping rate instead (e.g., sell the item at $20 and charge shipping fee of $2.50), or price in the shipping cost partially (e.g., sell the item at $22.50 and offer “Free Shipping”).
Direct Shipping Charges
Alternatively, you can directly charge your customers for shipping charges to be incurred. There are different options of setting the shipping rates.
- Flat rate: You can set a flat shipping rate for all items regardless of the weight and size.
- Table rate: For sellers with varying SKUs and destinations, shipping rates can be set based on a ‘table’ of rates, which factor in variables such as location, weight, and number of items in the cart.
- Live rate: Some e-commerce platforms enable you to display real-time rates from carriers.
For more details, check out our earlier post on “How to Set Your Shipping Rate”.
3. Determine how you will pay for duties and taxes
In Part 1, we introduced what duties and taxes are, with a sample duty calculator to estimate the duties and taxes that may apply for your item. In this post, we’ll elaborate more on options for paying duties and taxes, and how this impacts the way you set up your international shipping.
There are two ways you can choose to pay duty: DDU (Deliver Duty Unpaid) and DDP (Deliver Duty Paid). DDU means that the customer is responsible for paying the duties, and will be notified by the customs if there are any duties required to be paid before the shipment can get released to the customer. DDP, on the other hand, means that the shipper is responsible for paying the duties.
In the case of national posts (e.g., Japan Post), there is typically no DDP option, while in the case of courier services (e.g., DHL, FedEx, UPS), both DDP and DDU options are available. When placing a shipment request, you will need to let the courier know whether you’re opting for DDU or DDP, and you can also ask your shipping provider to pay for any duties on your behalf, and they will then bill you (in the case of DDP) or your customer (in the case of DDU) later on. This helps to minimize any delays at customs, but involves handling fees from the courier. Be sure to discuss the terms of handling fees with your courier during account setup, and try to negotiate on these fees.
DDP is a great option for the customer as it minimizes cost and delays for the customer, but most international shoppers are aware of having to pay any associated fees and taxes when buying online, so DDU ends up being the more commonly used option for now.
If you’re going with the DDU option, it’s important that you communicate very clearly to your customers that they will be paying for the associated fees and taxes.
You can do so by:
a) Having a dedicated page on tax handling. Here is an example from Bento&co.
b) Adding a line stating that taxes may apply, with a link to your dedicated page for further information. This line can be added to your:
- Product pages
- Store checkout page
- FAQ pages
- Email to customers when you confirm the order
For more information on duties and taxes, check out our post on “DDU, DDP, and Other Shipping Duties & Taxes Terms Explained”
4. Set up shipping rates and methods
Once you have set up your carrier accounts, figured out how to charge your customers for shipping and how you will pay for duties and taxes, you’re ready to set up the shipping methods and rates on your e-commerce platform. While the actual set up of the shipping methods and rates differs by the e-commerce platform, the broad principles are largely similar.
The first step is to enter your shipping origin (typically where your warehouse is), and also create shipping zones (regions and countries) to indicate where you will be shipping to. For example, you might have shipping zones for domestic shipping in your country, and as well as for “Rest of the World”, “Asia”, “Europe”, etc. In the case of some e-commerce platforms such as Shopify, you can create zones within a country, for example, by provinces, prefectures, or cities. Within each of these zones, you will have a list of countries that go into these zones.
The second step is to add in your shipping methods and rates for the zones. You can add shipping rates manually or use calculated shipping rates (available on some e-commerce platforms). However, it’s typically not advisable to charge your customers directly the full exact costs from your carriers, so we recommend going for the manual option, at least in the beginning.
In the case of the manual option, you can create different shipping methods depending on the shipping zone, the shipment’s weight and price, as well as the delivery times (standard vs express).
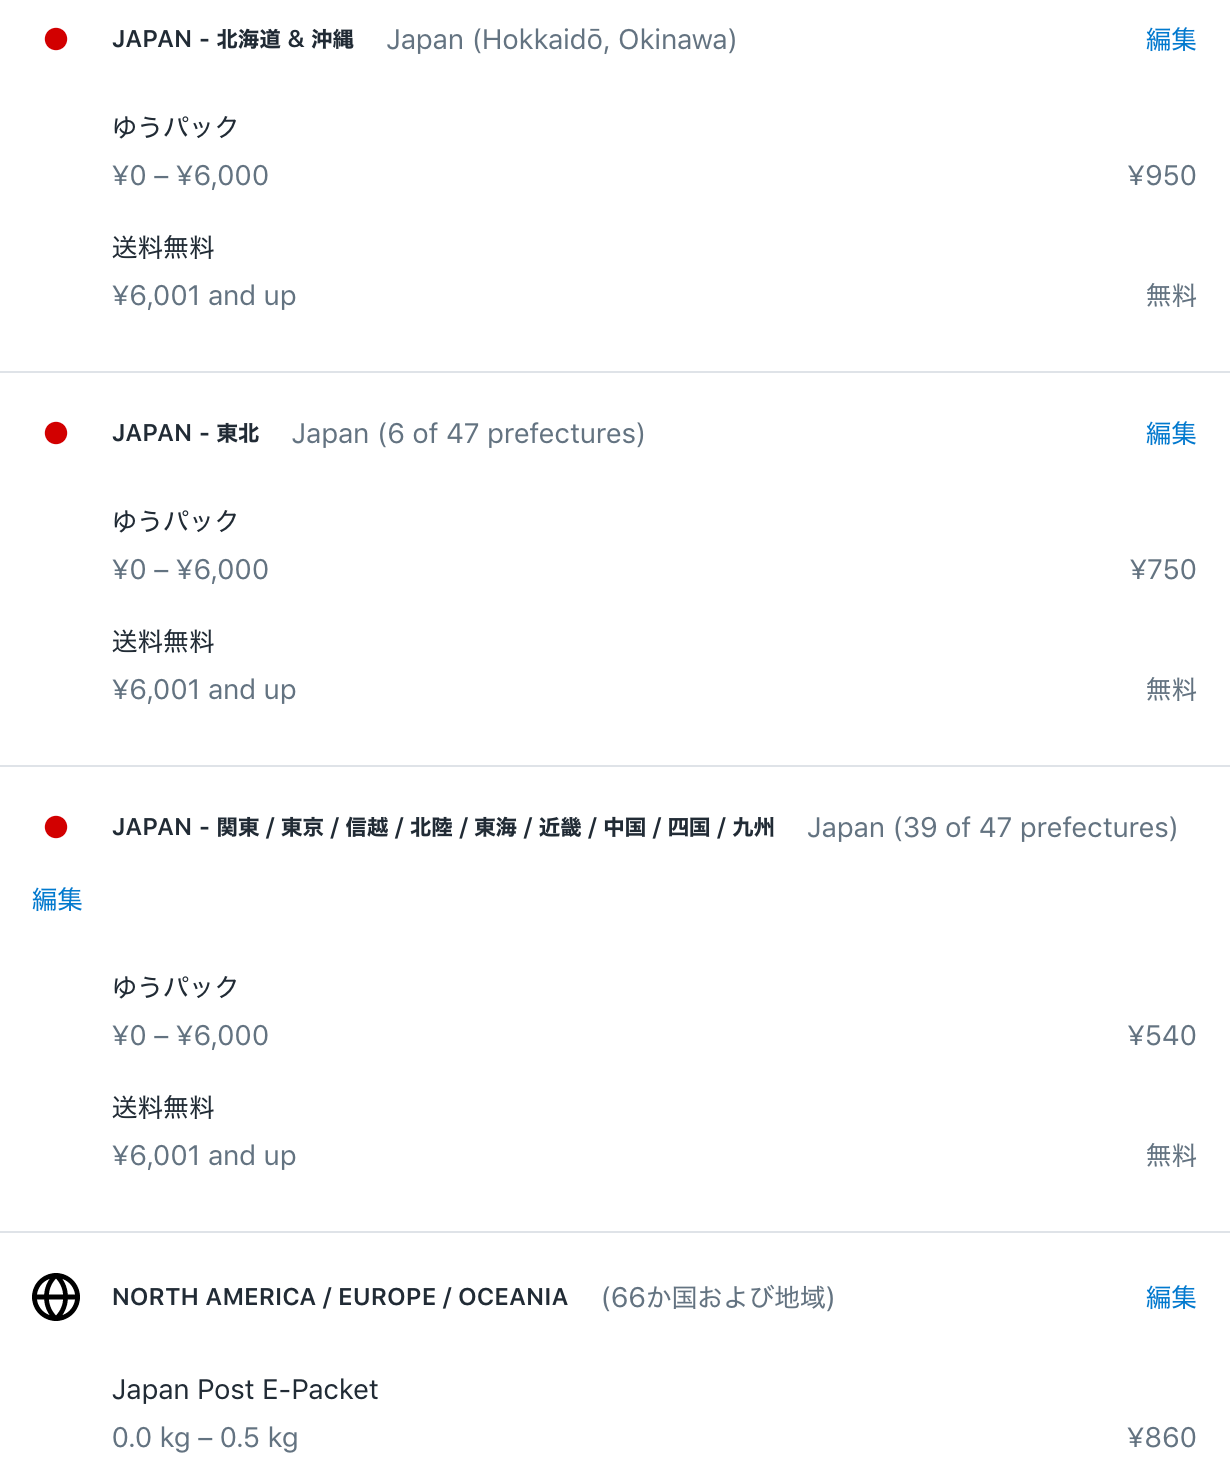
Here’s an example from a Shopify store:
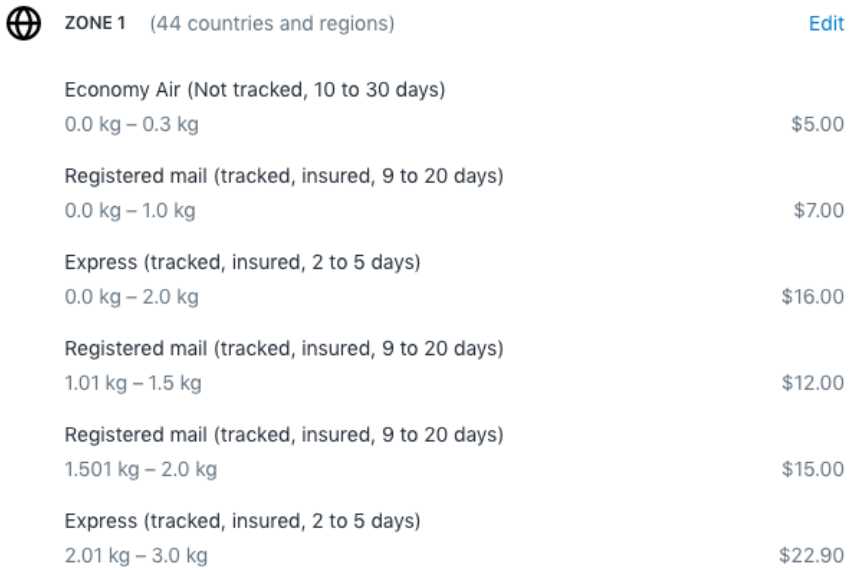
If your customers might want to know the shipping carrier when selecting the shipping option, you can consider adding the carrier name as part of the shipping method - for example, “DHL Express” instead of just “Express”.
For more information, do take a further look at the Help Center of your e-commerce platform to understand the specific technicalities applicable to your platform.
Summary
Checklist for International Shipping: Getting Set Up on International Shipping
❑ Create carrier accounts
❑ Determine what to charge your customers for shipping
❑ Determine how you will pay for duties and taxes
❑ Set up shipping rates and methods for your shop
And once you’re all set up, sit back, and wait for your first international order :-)
We hope you find this helpful! Stay tuned for our last part of this series on Checklist for International Shipping, where we’ll go in-depth into the shipping and post-shipping process.
About Ship&co
Ship&co is a global shipping platform designed by and for e-commerce sellers. Created by the team behind Bento&co, who have been selling on Shopify since 2008, Ship&co provides a simple and easy-to-use web dashboard and shipping API. Ship&co helps online sellers ship packages faster by automatically syncing orders and creating shipping labels and invoices in minutes. With Ship&co, you can create shipping labels for FedEx, UPS, DHL, NinjaVan, Yamato, Sagawa, and more, with just two clicks to complete the process and mark your orders as shipped. For more information on Ship&co, visit shipandco.com or reach out to us via [email protected] !