WooCommerce Shipping Zones: What Are They and How to Set Them Up
Get your WooCommerce store's shipping strategy in shape with our guide to shipping zones! Discover what shipping zones are and set it up following our step-by-step instructions.

If you're running an online store with WooCommerce, setting up shipping is an essential step to ensure that your customers are charged accurate shipping rates and that your shipping process runs smoothly.
Most important three elements here are Shipping zones, Shipping options and Shipping classes.
In this article, we'll firstly explain what shipping zones are in WooCommerce and why they're important, as well as provide a step-by-step guide on how to set them up. Whether you're new to WooCommerce or an experienced user, this guide will provide valuable insights into optimizing your shipping settings for your business needs.
By the end of this article, you will have a clear understanding of how to configure shipping zones for your store, which will help improve the customer experience and increase conversions.
- What are shipping zones in WooCommerce?
- Why are shipping zones important for your WooCommerce store?
- How to set up shipping zones in WooCommerce?
- Generate labels with Ship&co
What are shipping zones in WooCommerce?
Shipping zones in WooCommerce are geographical regions that you can set up to apply different shipping methods and rates to different areas. With shipping zones in WooCommerce, you can organize and manage your shipping settings based on where your customers are located.
By default, WooCommerce includes three shipping zones: "Rest of the World", "USA", and "Canada". However, you can create as many shipping zones as you need or leave it to general options.
When you set up a shipping zone in WooCommerce, you can define the countries, states, or zip codes that are included in that zone. Then, assign shipping methods and rates to that zone, which will be applied when a customer with an address in that zone makes a purchase.
For example, you may offer free shipping for customers in your local area, while charging a flat rate for customers in other parts of the country or the world.
Why are shipping zones important for your WooCommerce store?
Shipping zones are important for your WooCommerce store for several reasons:
- Accurate shipping rates: By setting up shipping zones, you can ensure that your customers are charged accurate shipping rates based on their location. This can help you avoid overcharging or undercharging for shipping, which can improve the customer experience and reduce the risk of disputes or chargebacks.
- Customization: Shipping zones allow you to customize your shipping methods and rates based on the needs of your business and your customers. For example, you may offer free shipping to customers in your local area or charge a flat rate for customers in a particular region.
- Control: Shipping zones give you more control over your shipping settings, which can help you optimize your shipping process and reduce shipping-related costs. By setting up shipping zones, you can streamline your shipping process and reduce the amount of time and resources required to manage your shipping settings.
- Targeting: Shipping zones can also help you target specific markets or customer segments. For example, you may offer different shipping rates or methods to customers in different countries or regions, depending on the demand for your products and the competition in those markets.
Overall, setting up shipping zones in your WooCommerce store is an important step in optimizing your shipping process, improving the customer experience, and increasing conversions.
How to set up shipping zones in WooCommerce?
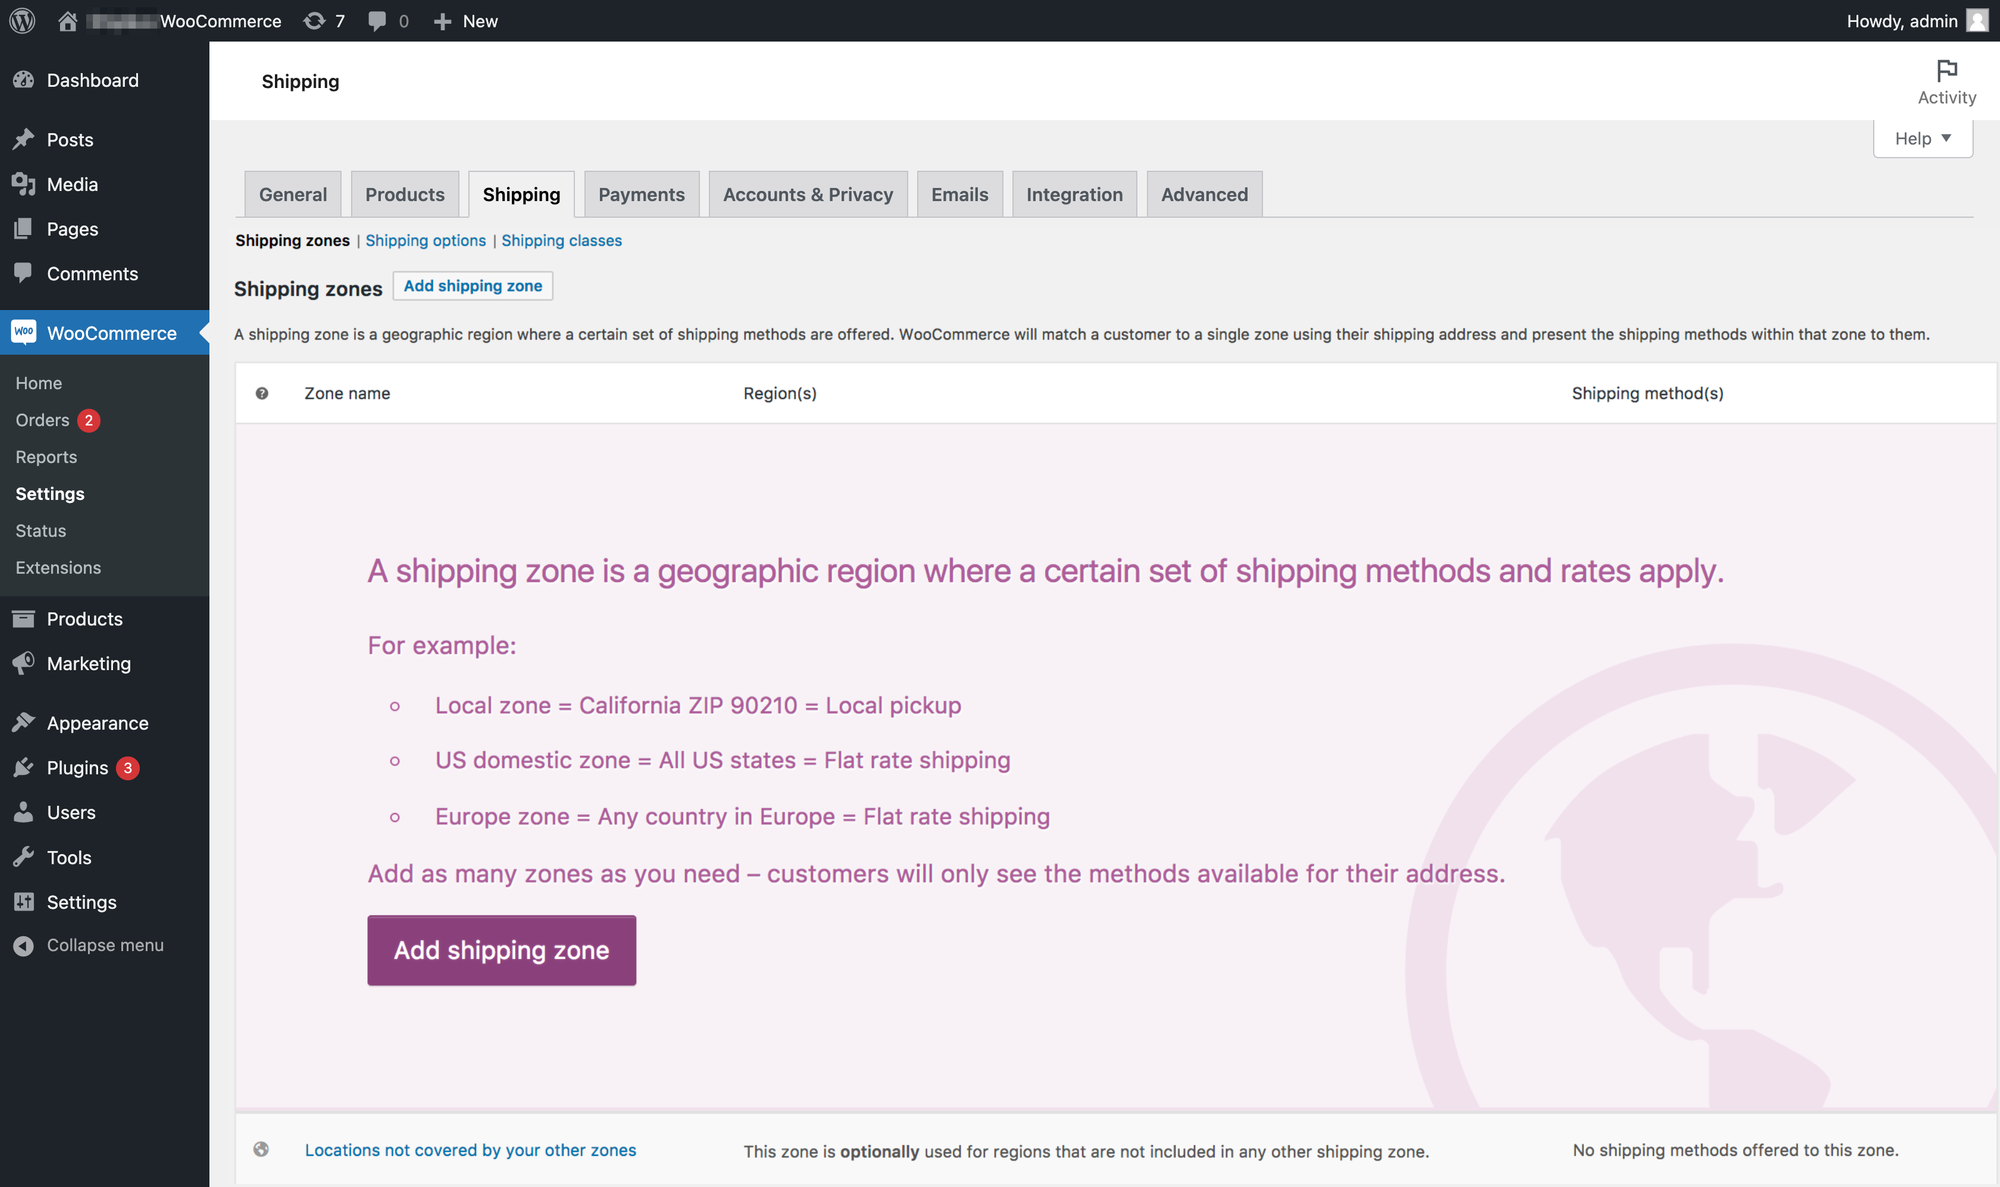
First of all, log in to your WordPress dashboard and click WooCommerce → Settings. In the settings page, there will be an option for Shipping. You can click and open up the shipping option for your WooCommerce store.
1. Setting up general options:
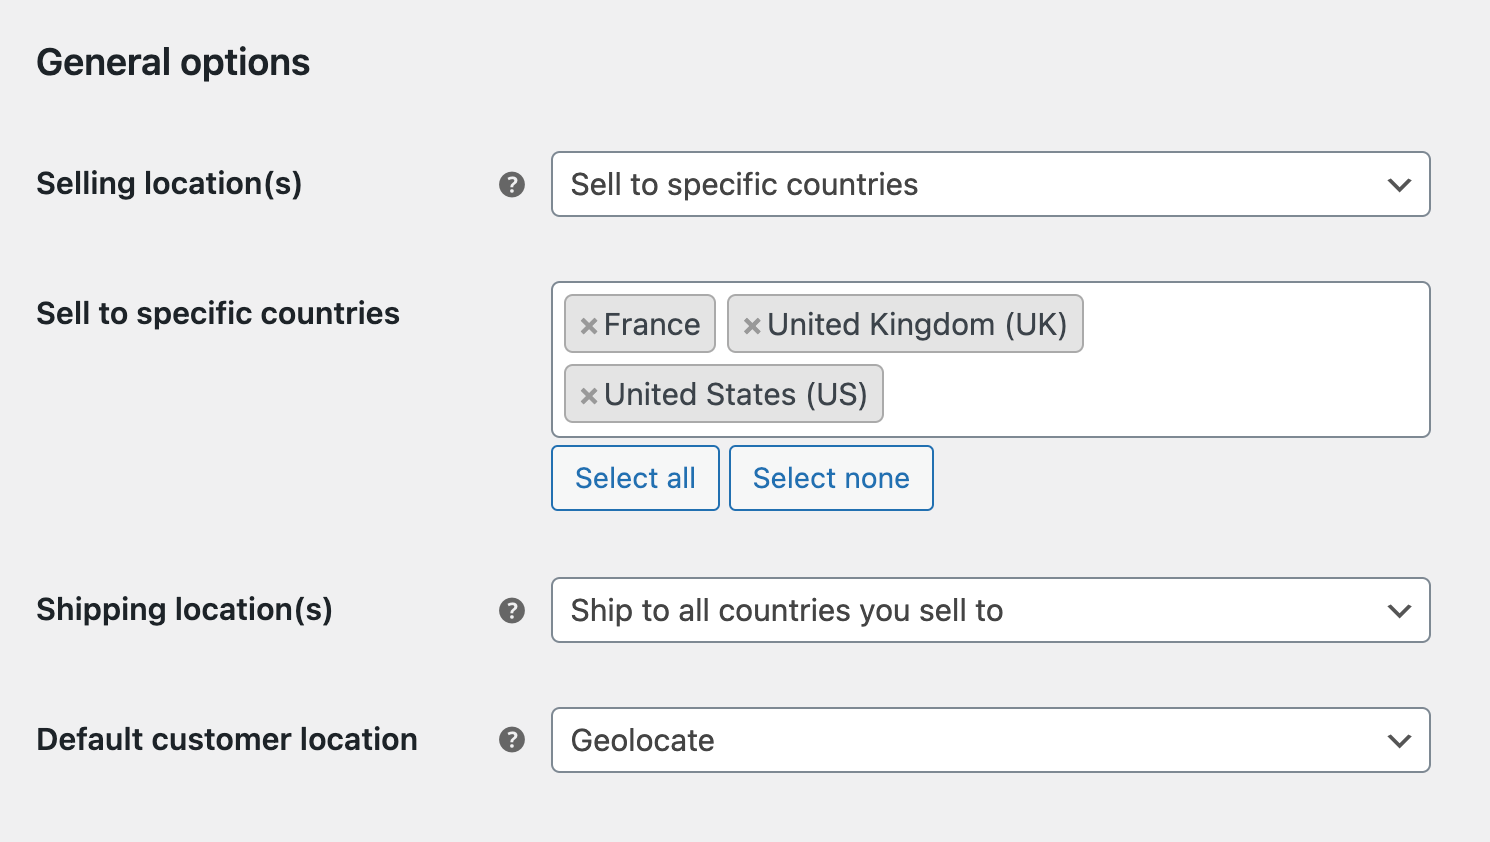
Before start adding shipping zones for your WooCommerce store, you can set up a limit of where you sell to and where you ship to with the setting in General menu:
- Selling location (s): Select based on three options, "Sell to all countries", "Sell to all countries, except for..." or "Sell to specific countries".
- Sell to specific countries: Add countries you want to sell.
*If you select "Sell to specific countries, this menu will appear so that you can limit your shipping destination. - Shipping location (s): Select based on four options, "Ship to all countries you sell to", "Ship too all countries", "Ship to specific countries only" or "Disable shipping & shipping calculation".
*Most of the time, seller can set this as "Ship to all countries you sell to". It is the easiest way to ensure your store will enable shipping only to the countries you are selling. Make sure not to set it as "Disable shipping & shipping calculation". Selecting this option means that you will not provide shipping for your products.
Once you successfully set these general options as you need, scroll down and click "Save changes".
Here's the example of how to set up General options for your WooCommerce store:
2. Adding shipping zones:
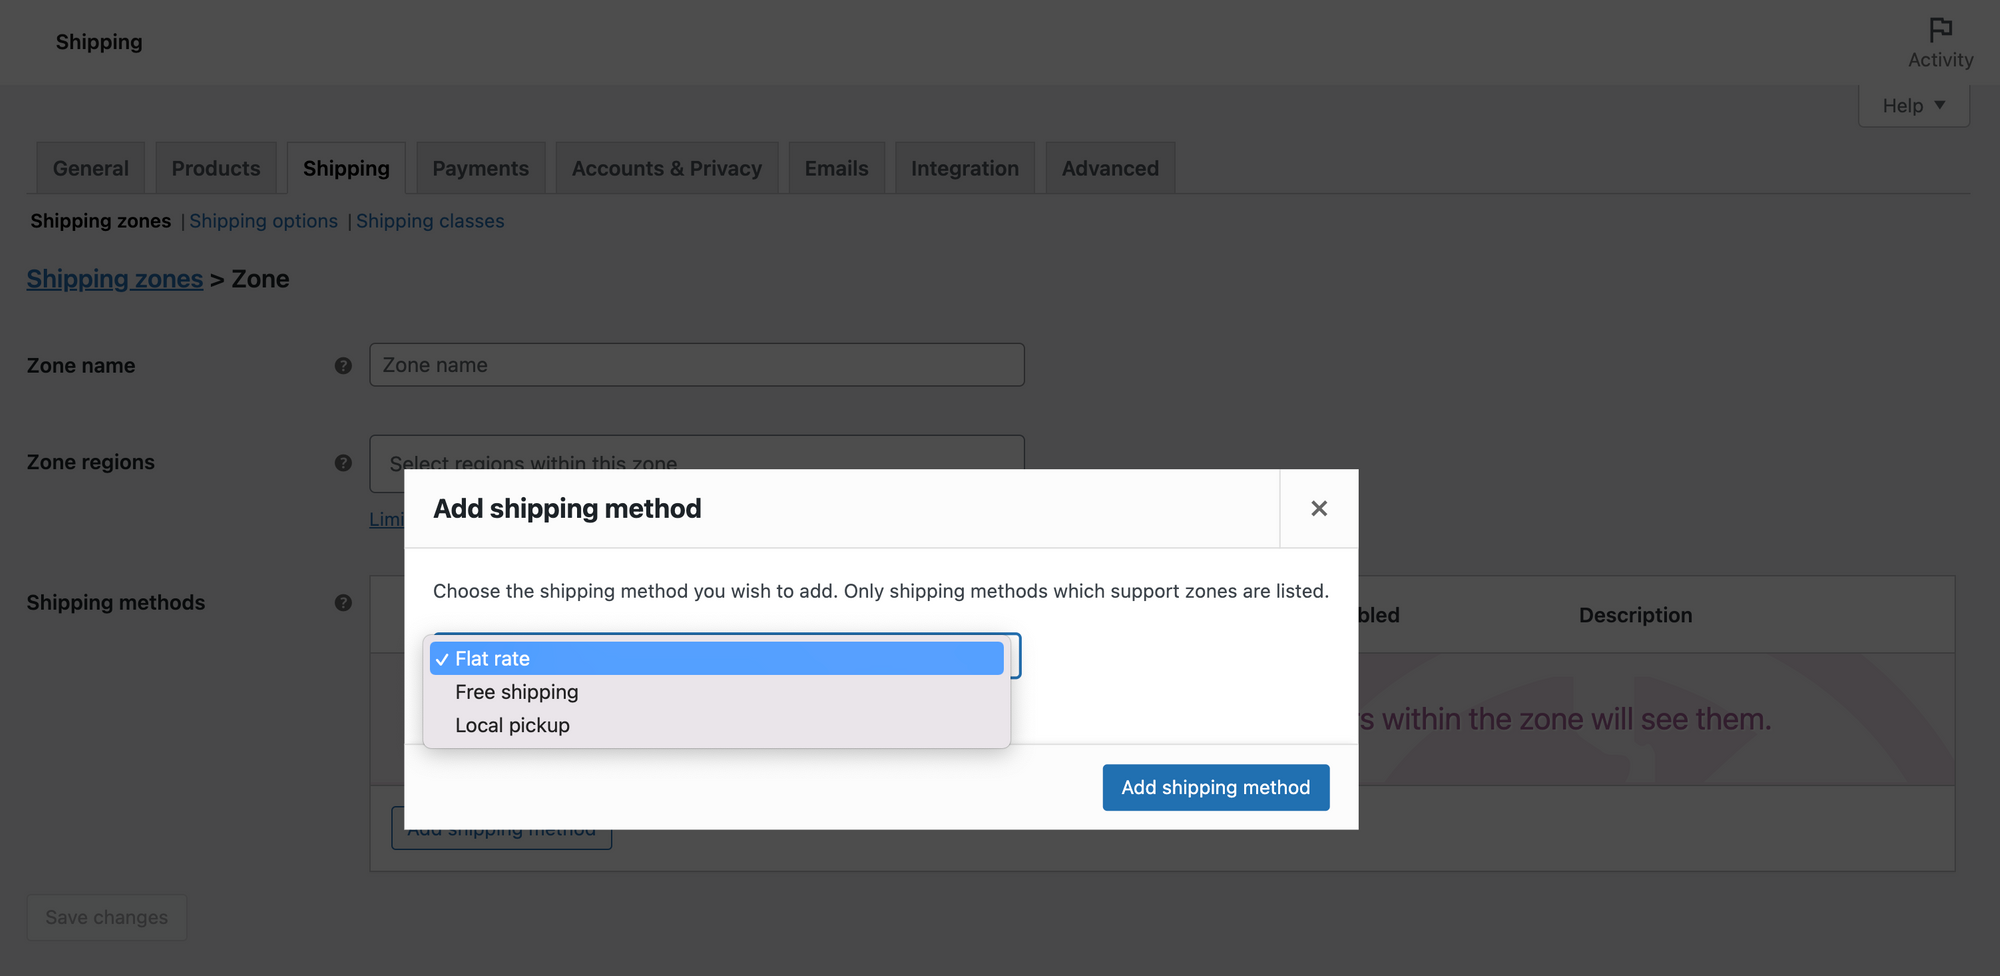
Next, move on to the "Shipping" menu. You can start by selecting "Add shipping zone" and fill out the required information for your shipping zone:
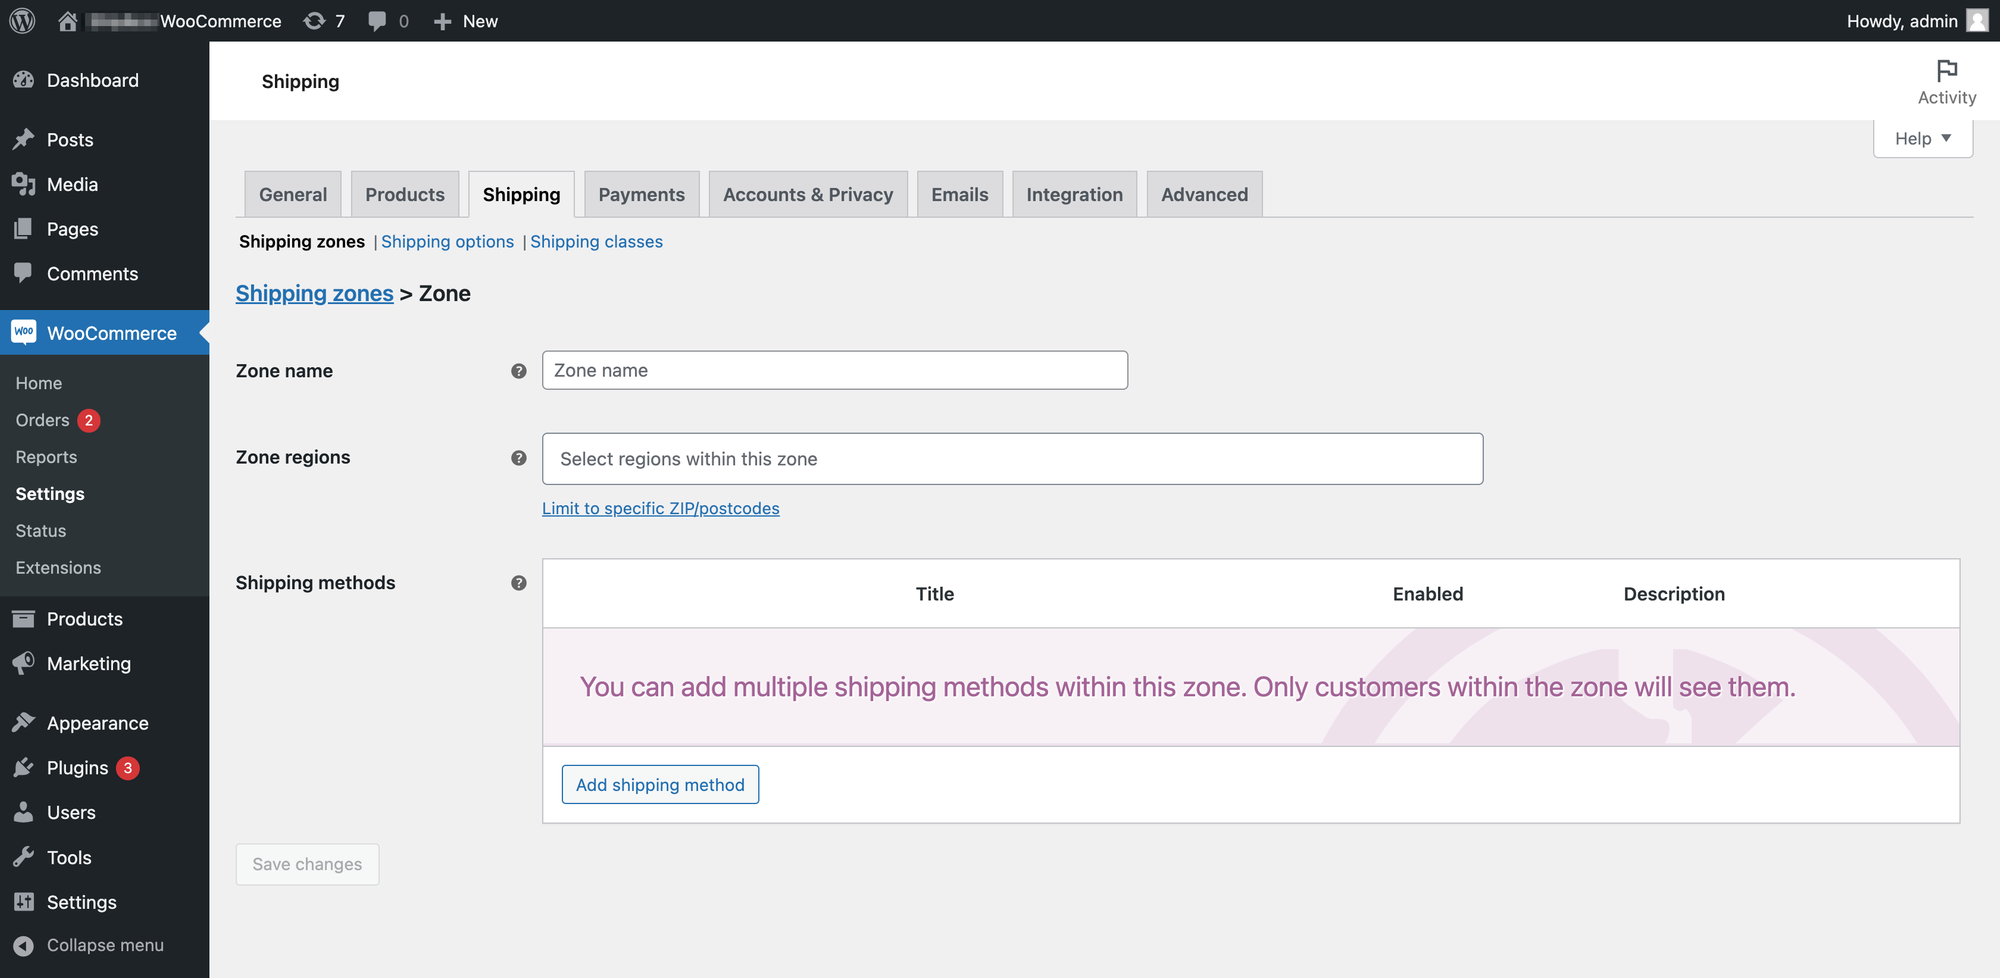
- Zone name: Enter a name for your shipping zone (e.g. "Local Shipping").
- Zone regions: Select the region that you want to include in your shipping zone (e.g. "United States").
*You can choose the locations within that region that you want to include in your shipping zone (e.g. specific states or zip codes). - Shipping methods: Click on the "Add Shipping Method" button to add a shipping method to your shipping zone.
*You can choose "Flat rate", "Free shipping" or "Local pickup".
Then, your Flat rate is now set as zero. Click at "Flat rate" and set the shipping rates up in the Flat rate Settings menu:
- Method title: Enter the name you want to keep for this particular shipping method.
- Tax status: Select between two options, Taxable to apply tax to your shipping or None if it is not applicable.
- Cost: Enter a cost (excl. tax) or sum (e.g. 2.95).
*You can set it flat rate per item by adding a simple formula like [qty]*2.95 or if you want to charge a flat fee plus a additional fee per item, you can set it like 2.95 + ( 2*[qty] ) in the cost field.
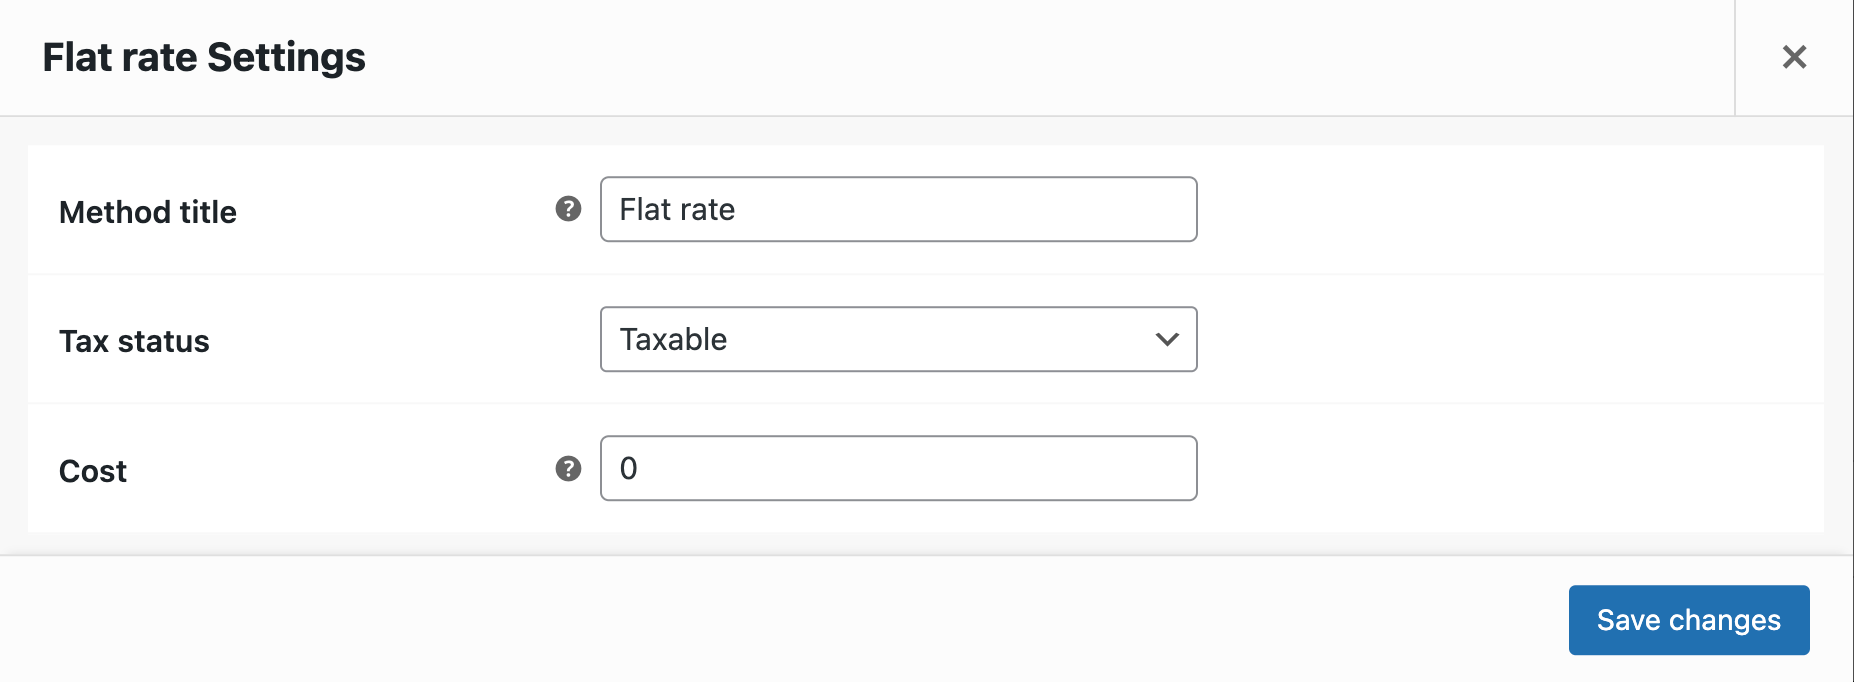
Lastly, hit on the "Save changes" button to save your settings.
And that's an easy step to set up the flat rate!
3. Setting up Free Shipping:
You can follow the similar step to set up "Local Pickup" or "Free Shipping" with some requirements or conditions for your WooCommerce store.
For those who want to add free shipping option for your store, click "Add shipping zone" and follow the same step but set the Shipping methods as "Free Shipping".
Once the free shipping method is added, you can follow the below steps:
- Title: Enter the name of shipping method
- Free shipping requires...: Select among four options, "A valid free shipping coupon", "A minimum order amount", "A minimum order amount OR a coupon" or "A minimum order amount AND a coupon ".
*Simplest way to do this is to go for "A minimum order amount" option. For example, you can offer free shipping for those who spent $180 USD or whatever amount that suits your profit margins.
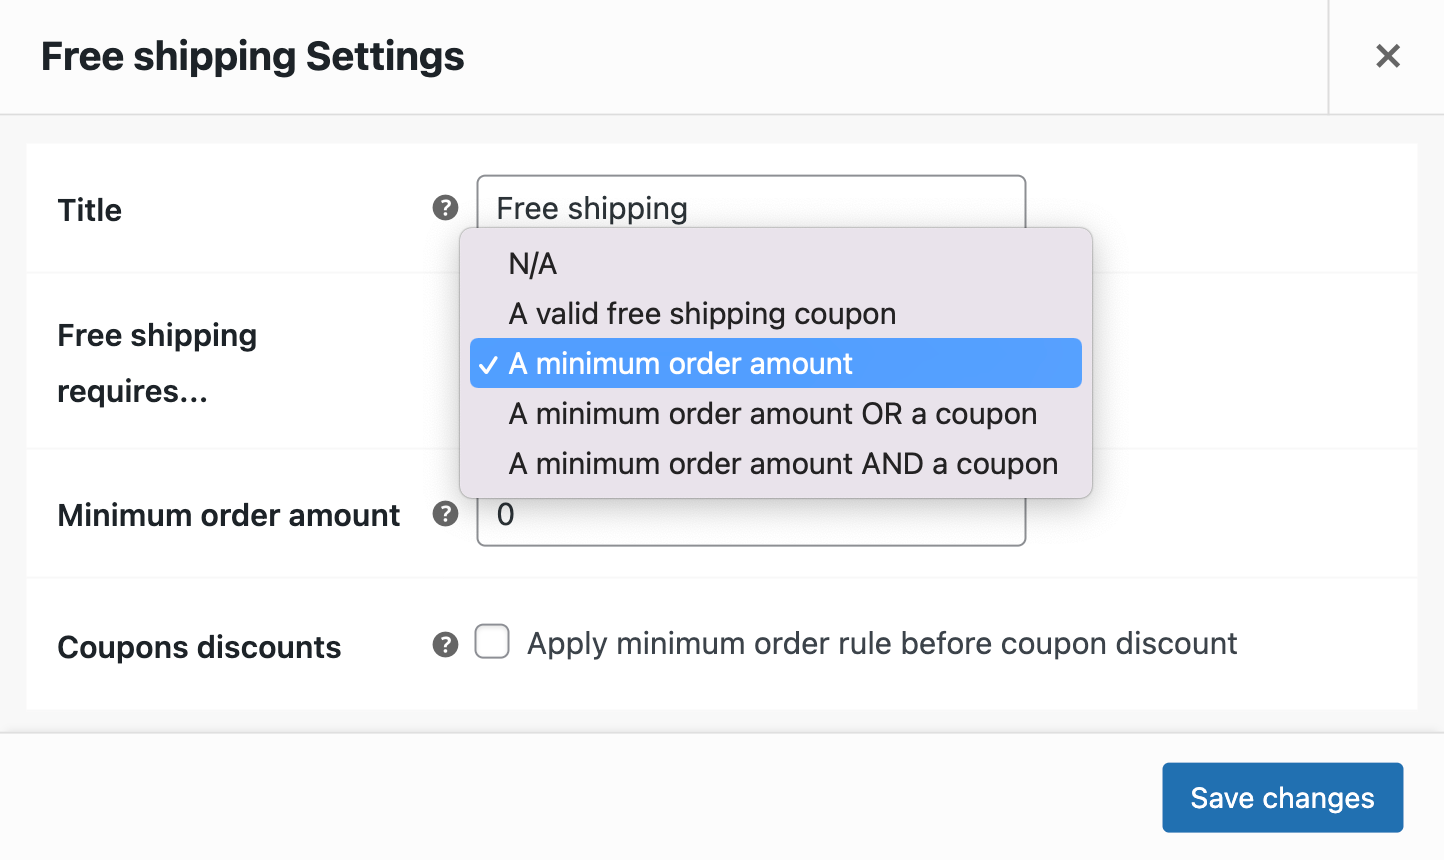
Again, click "Save changes" to finish up this setting.
Once you've set up your shipping zones, they will be applied automatically when a customer with an address in that zone makes a purchase.
Make sure to test your shipping settings thoroughly before launching your WooCommerce store to ensure that they are working as expected and providing a good customer experience. By testing your shipping settings and making adjustments as needed, you can optimize your shipping process and improve your bottom line.
Generate labels with Ship&co
Once your WooCommerce's shipping zones are successfully set up, you will need a plugin to help you manage shipping process efficiently.
Fortunately, there are several plugins available that can help streamline your shipping process and save you time and money. One such tool is Ship&co, a shipping software and WooCommerce shipping plugin that integrates seamlessly with your WooCommerce stores — no matter where you ship from.
Ship&co allows you to generate shipping labels quickly and easily, saving you the hassle of manually entering customer and shipping information. Let's find out the benefits of Ship&co for WooCommerce stores:
- Easily import orders from your WooCommerce stores to Ship&co dashboard
- Choose from a variety of shipping carriers including UPS, FedEx, and DHL and compare rates to ensure you're getting the best option
- Create labels using your preferable options, generate a tracking number for each package
- Automatically fulfill and update tracking number to your orders
Using Ship&co as your WooCommerce shipping plugin can help you save time and reduce errors in your shipping process.
By using a tool like Ship&co, you can streamline your shipping process and focus on other aspects of running your WooCommerce store.
Have questions? Try out Ship&co today!
About Ship&co
Ship&co is a global shipping platform designed by and for e-commerce sellers. Created by the team behind Bento&co, who have been selling on Shopify since 2008, Ship&co provides a simple and easy-to-use web dashboard and shipping API. Ship&co helps online sellers ship packages faster by automatically syncing orders and creating shipping labels and commercial invoices in minutes. With Ship&co, you can create shipping labels for FedEx, UPS, DHL, NinjaVan, Yamato, Sagawa, and more, with just two clicks to complete the process and mark your orders as shipped. For more information on Ship&co, visit shipandco.com or reach out to us via [email protected] !